Run the installation command:curl -L https://install.domoticz.com | bash
Then follow the instructions:


After goto http://192.168.0.121:8080 or http://pi01.local:8080 Domoticz appears with information to continue the configuration.

According to suggestion go to hardware tab and add sensors from our Raspberry Pi. Write name of Raspberry Pi and select type Motherboard sensors after that hit Add button.

After successfully adding your hardware, goto settings to do this select from top right corner Setup -> Settings. In settings set your coordinates it is necessary to so that Domoticz knows when it is sunrise, sunset, etc.
Po pomyślnym dodaniu naszego hardware, przechodzimy do ustawień, aby to zrobić wybieramy w górnym prawym rogu Setup -> Settings. W ustawieniach konfigurujemy swoje współrzędne, jest to niezbędne m.in. to tego aby Domoticz wiedział kiedy jest u nas wschód, zachód słońca itp.
Next step is add sensors from motherboard our Raspberry. To do that go to Setup -> Devices, it will be there list with available sensors.

To add sensor click green right arrow similarly, if we do not want a sensor in our dashboards, click the blue left arrow. After adding the sensors of interest to us, we can view their values in the Temperature and Utility tabs.

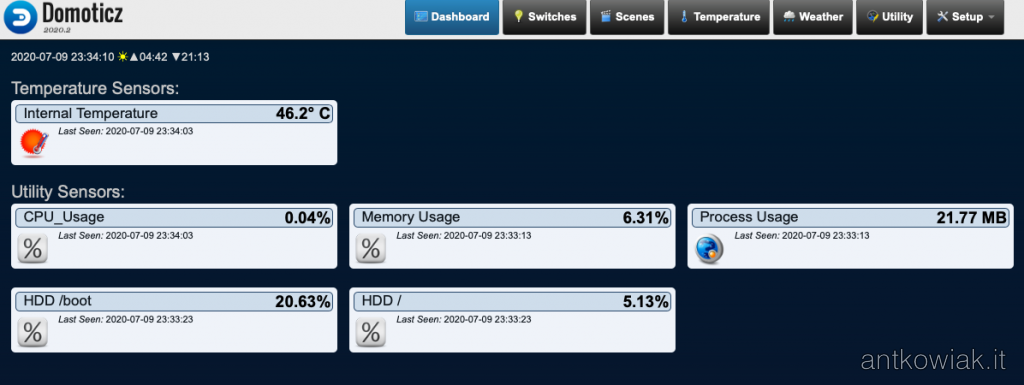
If we want to add a given sensor to main dashboard, just click on the star. After adding all of the sensors from the Raspberry dashboard it looks like this.

What’s next?
In the following entries, we will deal with the further configuration of Domoticz. Domoticz, by frequent saving temporary files to the memory card, can break it, sometimes even in a few days. To avoid this, we will configure a ram disk for temporary files.
